At Connect(); 2015, a new feature for Office 365 Groups called custom connectors was launched. With custom connectors, a new conversation can be started within an Office 365 Group programmatically, from your own custom application.
The way the connect to Office 365 button works is really simple, all it does is to redirect the user to the connectors page for Outlook and then after authentication, redirects the user back to a specified callback page. Here is the html for the button
This file contains bidirectional Unicode text that may be interpreted or compiled differently than what appears below. To review, open the file in an editor that reveals hidden Unicode characters.
Learn more about bidirectional Unicode characters
And the description for each query string parameter from the Outlook Dev Center page:
Parameter
Details
state
You can use the state parameter to save your application state. If you supply a value for state it is returned back to the specified callback_url when the application returns. This is an optional parameter.
app_name
Provide your application name. This name will show up in the authorization popup and in the connector list page that your users would see. The app_name is a mandatory parameter and can range from 1 to 100 characters.
app_logo_url
Provide the URL to your application logo. Ensure that the link is not behind an authentication wall and is publicly reachable. Use a logo of size under 10KB (preferably 256x256px) and type JPEG, PNG, GIF, TIFF, BPM, X-ICON or SVG+XML. The app_logo_url is a mandatory parameter.
callback_url
The callback URL should be a valid HTTPS URL without any query parameters. When the application returns successfully, the state passed, name and webhook URL of the selected group are returned as query parameters to the callback_url. If the application encounters a failure the state passed and the error code are returned to the callback_url.
This is how the button is rendered on your custom page:
2) Authentication:
When you click on the button, you are taken to the Office 365 Sign-in page if you are not already signed in. Next, you get a list of Office 365 Groups which you are a member of. You have to select a group in which the message will be posted, and click on Allow:
3) The Code:
The next step is to actually post the Office 365 Group card. Behind the scenes, I have used RestSharp in an MVC controller to make the post:
This file contains bidirectional Unicode text that may be interpreted or compiled differently than what appears below. To review, open the file in an editor that reveals hidden Unicode characters.
Learn more about bidirectional Unicode characters
And if you now navigate to the Office 365 Group in Outlook, you will see 2 new messages, the first one is when the connection to the custom application is set:
And the next one is the actual message we posted from the MVC controller:
This allows a user to see the SharePoint site chrome in their own preferred language. Now in this post, lets have a look at how to have localized custom text so that the user can see custom labels, headings etc. in their preferred language.
Some notes around this:
1) This approach is based on the multilingual features of SharePoint Term Sets:
It is possible to have multi-lingual term sets because each term in a term set has a unique ID and each term can have multiple labels. You can designate a default label for a term in each language available for a term store. A term can then have multiple synonyms in each of these languages, as well as labels and synonyms in other languages.
Users will also see managed terms displayed in their preferred language, regardless of the actual default language of the term store.
If no labels are specified for terms in the language in which a user is viewing a term, then the default label for the term in the default language of the term store will be displayed to users.
3) Based completely on JSOM, JavaScript and the SharePoint Term Store.
4) This approach is built on top of theMUI features in SharePoint. Which means that the user created content such as list item data, documents etc. will NOT be translated.
5) The SharePoint Online Term Store is treated as a "data source" for custom multilingual text. Each custom text is a term in the "Translations" term set. For each language that you have to support add a new label to the term for that language.
Lets get started:
1) Setup the Term Store to support term labels in multiple languages
I have set the default language of the Term Store as English and then added Dutch as a Working Language. This means that the term store will be able to support labels for a term in English as well as Dutch.
After adding the working languages, I have created a new Term Group called "My Group".
Under "My Group", I have created a Term Set called "Translations".
Under "Translations", I have created 3 terms: Communications, Marketing and News.
We will use these 3 terms to show the custom multilingual text.
We need to add the default language labels for each term:
After a label has been specified for each term, they will appear in the following way:
When English (default) is selected:
When Dutch is selected:
The translation framework will work in the following way:
If I am an English user and I have set my preferred language as English, when the terms for the "Translations" term set will be returned, JSOM will return the English language labels by default. If I am a Dutch user and I have set my preferred language as Dutch, when the terms for the "Translations" term set will be returned, JSOM will return the Dutch language labels by default. If I am an Italian user and have set Italian as my preferred language in my user profile, SharePoint will return the English labels for the Translations term set as we have not selected Italian as one of the Working Languages of the Term store, nor have we set any labels in Italian.
2) Add Local Custom Properties to Terms
Next, we will add a local custom property for each term to identify it regardless of the language. This will serve as the ID of the term when we fetch it from JSOM:
This is the list of the local custom properties I have created for my terms:
Term
Local Property Name
Value
Communications
TranslationID
MUITextCommunication
Marketing
TranslationID
MUITextMarketing
News
TranslationID
MUITextNews
We could use the Term GUID here but I prefer using a custom ID as it is more readable. Also, if someone deletes one of the terms by mistake, it is easy to create a new Term and set the custom ID in the properties. If we were using a GUID, we would have to use code to create a new term with a specific GUID.
3) The Translation framework
After the Term Store is correctly setup, all we need to do is get the terms from the "Translations" term using the JavaScript Client Object Model (JSOM) and display them in the UI:
Query the term store to get the terms from the "Translations" term set.
SharePoint will return the term labels in the current user's preferred language if:
The alternate language is enabled on the current site
The current user has set the language as a preferred language in their user profile
The term store supports the language as a "Working Language" as shown in step 1
A default label is defined for the terms in that language.
If any one of these conditions is not fulfilled, then the English labels for the terms will be fetched as it is the default language of the Term Store.
The term labels will be stored in the cache.
This file contains bidirectional Unicode text that may be interpreted or compiled differently than what appears below. To review, open the file in an editor that reveals hidden Unicode characters.
Learn more about bidirectional Unicode characters
Since it is not advisable to make a call to the Term Store on every page load, it is a good idea to cache the labels for a particular user. My recommendation would be to use the browser web storage. Whether you use session storage or local storage depends on the implementation of the solution. MDN has a great article on this https://developer.mozilla.org/en-US/docs/Web/API/Web_Storage_API
For demo purposes, I am using the sessionStorage and storing the term labels as a JSON object.
When the preferred language of the current user is English:
When the preferred language of the current user is Dutch:
5) Using the framework to show localized text
After the framework is correctly setup, all we need to do is call the framework correctly to show the custom text in the language of the current user:
This file contains bidirectional Unicode text that may be interpreted or compiled differently than what appears below. To review, open the file in an editor that reveals hidden Unicode characters.
Learn more about bidirectional Unicode characters
So recently, I was working on a SharePoint Online project and was looking for a way to automate the installation and update of a No Code Sandbox Solution (NCSS).
Just so you know, there are a couple of caveats to this approach as mentioned in the PnP documentation: // NOTE: The lines below (in OfficeDev PnP) wipe/clear all items in the composed looks aka design catalog (_catalogs/design, list template 124).
Also, installing and activating the solution with this method will also automatically activate all Site-Collection level features, even if they have been set to AutoActivate = False
What I have found is, by changing the Major and Minor version numbers (which renames the WSP), you can also use the same method to update an existing solution
Here is my PowerShell script which Installs a solution (if it does not already exist) or updates it if the solution already exists, and the Major or Minor version number is different.
The PowerShell script:
This file contains bidirectional Unicode text that may be interpreted or compiled differently than what appears below. To review, open the file in an editor that reveals hidden Unicode characters.
Learn more about bidirectional Unicode characters
#The Install and Apply methods create a copy of the solution. This copy is renamed according to the Major and Minor Version specified in the DesignPackageInfo object.
#Once this copy is activated, we no longer need the original wsp file uploaded to the solution gallery.
The script is straightforward and similar to the other posts. The main difference from the PnP version being I do not run the DesignPackage.Uninstall method before Installing the solution and I also run the DesignPackage.Applymethod after Installing the solution
1) Install a Solution:
This file contains bidirectional Unicode text that may be interpreted or compiled differently than what appears below. To review, open the file in an editor that reveals hidden Unicode characters.
Learn more about bidirectional Unicode characters
After the script is run, I can see my WSP installed in the solution gallery with the Major and Minor versions I specified:
2) Update a Solution:
To update the solution, first we will need an updated WSP. It should have the relevant sections specified in the UpgradeActions Feature XML element. @cann0nf0dder has a great post on configuring a sandbox solution for update here:Upgrading Sandbox Solutions in SharePoint
Once you have the updated WSP, all you need to do is change the Major and Minor version numbers in the script and Install your new WSP.
This file contains bidirectional Unicode text that may be interpreted or compiled differently than what appears below. To review, open the file in an editor that reveals hidden Unicode characters.
Learn more about bidirectional Unicode characters
Here is some CSOM code which updates the personal regional settings of the current user or another user (if you are a tenant admin and have the rights to update user profiles)
Before update:
The code:
This file contains bidirectional Unicode text that may be interpreted or compiled differently than what appears below. To review, open the file in an editor that reveals hidden Unicode characters.
Learn more about bidirectional Unicode characters
I had an interesting decision to make recently: Should the root site collection of the SharePoint Online tenant be used to host the main intranet landing site? A very common requirement for a SharePoint Online project is a customized landing site with the company's branding, logo and some custom functionality. You might refer to this as the Home page, Intranet home, Portal site, News hub etc. It's a site where the users will first land when they arrive on the Intranet/Digital Workspace.
So where should this site be located? Right now, I would NOT recommend this to be the root site collection in SharePoint Online (https://tenant.sharepoint.com) It is much more convenient to use another site collection like /sites/intranet or /sites/portal etc. In fact, I would recommend that the root site collection should be left alone and no customizations should be deployed to it. Here are the reasons why:
1) Custom Scripts
In the SharePoint Online admin portal, you can assign a site collection under which the self-service sites will be created. (by default it is the root site collection of the tenant e.g. https://tenant.sharepoint.com) So whenever a user creates a self-service site, it will be created as a sub site of this site collection.
SharePoint Online also gives you the ability to turn off custom scripts on self-service created sites. (The default is that custom scripts are NOT allowed on self service sites). This is to prevent users from injecting scripts into web parts and compromising the integrity of the site. This article describes this feature in detail:
But what the article does not mention is that the custom scripts are disabled only on the site collection (and its sub sites) which is assigned for creating self service sites. All other site collections in the tenant can still run custom scripts. I have highlighted the relevant areas in the image below:
(click to zoom)
Now just to recap, here are the defaults when you create a new Office 365 tenant: 1) Root Site collection is assigned for creating self service sites. 2) Custom Scripts are turned OFF for the site collection under which the self service sites will be created. Naturally, your customized intranet portal will have lots of JSOM or REST API/Ajax code embedded in Script Editor or Content Editor Web Parts. If this custom site is to be located at the root site collection, you will have to change at least one of these default settings. Either nominate a different site collection for creating the self service sites or change the Custom Scripts option to "Allow users to run custom script on self-service created sites"
Depending on how strict the governance is, changing default settings can be easy in some cases but more often that not, you will have to have a valid reason if you are going to do this in production tenants.
2) Root Site collection cannot be created using PowerShell Cmdlets
There is a limitation in the SPO PowerShell Cmdlets which prevents you from creating the root Site collection. When you try doing so, you get the following error:
Now in most projects I have worked on, we have had a deployment script which runs off the build server. For integration testing, the deployment script creates a new site collection once every day and deploys the latest code to it. If you have a similar continuous integration process, you will not be able to create a new root site collection with the deployment script. It will have to be a manual step each time the deployment is done. This can get bit annoying.
3) No flexibility to delete and re-create the Site collection as everything else stops working.
If something goes wrong in the deployment or some site columns or content types are corrupted, I do like to have the flexibility to delete the site collection and start afresh by creating a new one with the same url. This is not really an option if you are deploying to the root site collection.
If you delete the root site collection, all other site collections in the tenant will stop working. I have also observed that SharePoint Search also stops working. This is why when you try to delete the root site collection from the admin portal, you get a big red warning message:
(click to zoom)
Now if this is a developer tenant and multiple developers are working in their own site collections, they will be blocked until a new site collection is created at the root.
If this is a production tenant and something else like the collaboration solution is already deployed to another site collection in the tenant, it will also stop working.
The reason for this seems to be that when a user wants to navigate to any site collection in the tenant, the authentication is done via a page located in the root site. If the root site collection is missing, the user cannot be authenticated and hence cannot navigate to any site collection.
(click to zoom)
Due to all these reasons, I feel that the root site collection is an important piece for SharePoint Online to work correctly. I recommend treating it like a "system" site. It is best to leave it alone and not deploy any customizations to it.
Recently, the ability to modify the Regional and Language settings of a site has been added to the client APIs in SharePoint 2013 and SharePoint Online. While the support for SharePoint 2013 was added in the December 2014 CU (as announced by Vesa here), the support for SharePoint Online has been a more recent addition.
But, I could not find JSOM code example of these APIs. So I am listing down some of the most frequently used Regional and Language functions here.
1) Add a Supported UI Language:
This file contains bidirectional Unicode text that may be interpreted or compiled differently than what appears below. To review, open the file in an editor that reveals hidden Unicode characters.
Learn more about bidirectional Unicode characters
This file contains bidirectional Unicode text that may be interpreted or compiled differently than what appears below. To review, open the file in an editor that reveals hidden Unicode characters.
Learn more about bidirectional Unicode characters
3) Disable Multi Lingual and Remove all UI Languages:
This file contains bidirectional Unicode text that may be interpreted or compiled differently than what appears below. To review, open the file in an editor that reveals hidden Unicode characters.
Learn more about bidirectional Unicode characters
This file contains bidirectional Unicode text that may be interpreted or compiled differently than what appears below. To review, open the file in an editor that reveals hidden Unicode characters.
Learn more about bidirectional Unicode characters
This file contains bidirectional Unicode text that may be interpreted or compiled differently than what appears below. To review, open the file in an editor that reveals hidden Unicode characters.
Learn more about bidirectional Unicode characters
This file contains bidirectional Unicode text that may be interpreted or compiled differently than what appears below. To review, open the file in an editor that reveals hidden Unicode characters.
Learn more about bidirectional Unicode characters
The recent guidance from Microsoft regarding the provisioning of SharePoint artifacts is pretty clear. The recommendation is to completely move away from declarative creation of Site Columns, Content Types etc. and instead, create them completely from code.
To support this approach of programmatically creating artifacts, a lot of work is being done on the "Provisioning Engine" in the OfficeDev Patterns and Practices Library on GitHub.To put it very simply, the Provisioning Engine reads a predefined XML file called the "PnP Provisioning Schema" and creates all the SharePoint artifacts using CSOM. Since this engine predominantly uses C#/.NET, it is expected to be run from somewhere like an Azure Web Job, a Web Application on an IIS server or a simple console application.
This method of provisioning is great for clients who opt for Azure subscriptions or IIS servers along with their SharePoint roll-outs. But this is not necessarily true with clients who only want to go for SharePoint or who do not have enough budget for additional Azure or IIS installs. So far, the only option in these cases is to go with the traditional declarative XML based provisioning using No Code Sandbox Solutions (NCSS). This approach is still valid at this time and Microsoft has stated that No Code Sandbox Solutions continue to remain supported: http://blogs.msdn.com/b/sharepointdev/archive/2014/01/14/deprecation-of-custom-code-in-sandboxed-solutions.aspx
Still, in this post I am going to explore another form of provisioning SharePoint artifacts completely based on the JavaScript Object Model (JSOM). Since the provisioning is done completely from JavaScript running in the browser, there is no need for a platform like Azure or IIS to run this code. I came across the following project in Office Dev PnP which shows how to use a SharePoint hosted Add-In (App) to create artifacts like Site Columns and Content Types etc. in the host web.
This file contains bidirectional Unicode text that may be interpreted or compiled differently than what appears below. To review, open the file in an editor that reveals hidden Unicode characters.
Learn more about bidirectional Unicode characters
This file contains bidirectional Unicode text that may be interpreted or compiled differently than what appears below. To review, open the file in an editor that reveals hidden Unicode characters.
Learn more about bidirectional Unicode characters
1) This project uses a SharePoint Hosted Add-In (App) to run the JSOM code. But with a few modifications, it can be made to run from a JavaScript file provisioned to a document library with a No Code Sandbox solution. The readme file of this solution mentions an additional project "Provisioning.Jsom.Ncss" which seems to be missing from the solution. My guess is this project did the exact same thing. With this approach, we remove the dependency on the Add-In (App) Model for provisioning.
2) Currently for values like site column names, types, content type names etc hard coded strings are being used. This can be modified to be read from an XML file, preferably the PnP Provisioning Schema. The schema XML file can be deployed with the Provisioning JavaScript file in the NCSS itself.
3) This approach can be used to create sub sites but not site collections as there is no way right now to create site collections through JSOM. So the deployment process will have to be manual creation of a Site Collection with an empty web template, and then to upload the WSP which will deploy the JS file to the SharePoint site. This file will then do the artifact provisioning.
I am going to explore these options and will post something in the future around this approach.
Thanks for reading. Hope you find this information useful in some way!
In my previous post, I wrote about Getting started with the Office 365 Unified API. In that post, I introduced the new Office 365 Unified API and created a basic console application which used Azure AD for authentication and consumed the Office 365 Unified API. But chances are that a console application is not going to be a solution to most of your business needs. That is why, in this post we will see how the Office 365 Unified API can be used in an ASP.NET MVC application.
Since the Office 365 Unified API uses Azure AD for authentication, these are the basic steps to get your application authenticated:
1) Request an authorization code 2) Request an access token based on the authorization code. (when you successfully make this request, you also get back the refresh token along with the access token) 3) Make a request to the desired resource e.g. "https://graph.microsoft.com/beta/myOrganization/users" using the access token. 4) When the access token expires, use the refresh token to get a new access token instead of going through the entire authentication flow again.
See the following links for more details on the Office 365 Unified API and the Azure AD authentication flow:
Alright, we are finally ready to write some code now :)
In your MVC Controller, create an action called SignIn. We will use this action to redirect the application to the Azure AD Authorization Request Url:
This file contains bidirectional Unicode text that may be interpreted or compiled differently than what appears below. To review, open the file in an editor that reveals hidden Unicode characters.
Learn more about bidirectional Unicode characters
This will take the application to the Azure AD login page where the user will have to enter his/her credentials. Once the credentials are successfully authenticated, the application will be taken to the redirectUrl mentioned in the code. This redirectUrl is a url to another Action in our MVC app. At this time, the url will also contain the Authorization code mentioned in step 1 and 2 above.
The Authorize action mentioned in the redirectUrl looks like this:
This file contains bidirectional Unicode text that may be interpreted or compiled differently than what appears below. To review, open the file in an editor that reveals hidden Unicode characters.
Learn more about bidirectional Unicode characters
This will get the Authentication code from the request parameters. Based on the Authentication code, it will make a call to Azure AD to get the Access token. Once we get the Access token, we will store it in the session so that we can use it for multiple requests.
A production level solution will probably need a better mechanism to store the Access token. Andrew Connell has written a great article on storing the access token in a database. See the article here:
Now that we have a valid Access token, we are ready to actually make a call to the Office 365 Unified API resource to get data. I have used a simple HttpClient to make the REST call
This file contains bidirectional Unicode text that may be interpreted or compiled differently than what appears below. To review, open the file in an editor that reveals hidden Unicode characters.
Learn more about bidirectional Unicode characters
Once the call is successful, you get JSON back which then you are free to mangle in your code.
In my sample application, I have also written calls for getting all the users from the tenant and the tenant details. Check it out here: https://github.com/vman/O365UnifiedAPIMVC
Additional Reading/Fiddling:
Here is the complete list of REST calls you can currently make using the Office 365 Unified API:
Also, if you want to try out REST API without actually writing any code, this is a great tool which can help you make calls and see the response: http://graphexplorer2.azurewebsites.net/
Only thing is you will need credentials to install the application in your Azure Tenant.
The Office 365 Unified API was recently launched at Build 2015. It uses Azure AD for authentication and has just one endpoint "graph.microsoft.com" which can be used to query for data from any service across Office 365.
This is a very important thing according to me because in the earlier versions of this API we had to query a discovery service and get the URL of the individual service (SharePoint, Outlook, Azure AD etc.) from which we wanted to get the data. With the new unified endpoint, it becomes easier for us Developers to just query a single endpoint for data from any of the services across Office 365.
1) The very first thing you will need to do is register your application in Azure AD and get the client id. You can think of this as being somewhat similar to registering an App Principal for a SharePoint App (Add-In as it's now called).
For my test app, I have registered a Native Application (as opposed to a Web Application) mostly because the process for a native application is a bit simpler. For a Web Application, you also need a client secret along with the client id. I decided to keep things simple for my first console app.
2) When you register your app to Azure AD, do not forget to grant the appropriate permissions in the "permissions to other applications"
3) Make a note of your client Id. You will require this in your code:
4) Create a new Console Application Project in Visual Studio and add the following NuGet packages to it:
5) Now you are set up to write code against the Office 365 Unified API.
The very first thing you will need to do is get the access token from Azure AD. Once you have the access token, all you need to do is create an object of the GraphService class and use it to get data from Office 365 provided you have the right permissions set up in Azure AD.
Here is my sample console application code:
This file contains bidirectional Unicode text that may be interpreted or compiled differently than what appears below. To review, open the file in an editor that reveals hidden Unicode characters.
Learn more about bidirectional Unicode characters
Once you run this code, you will get a prompt to enter your Office 365 credentials:
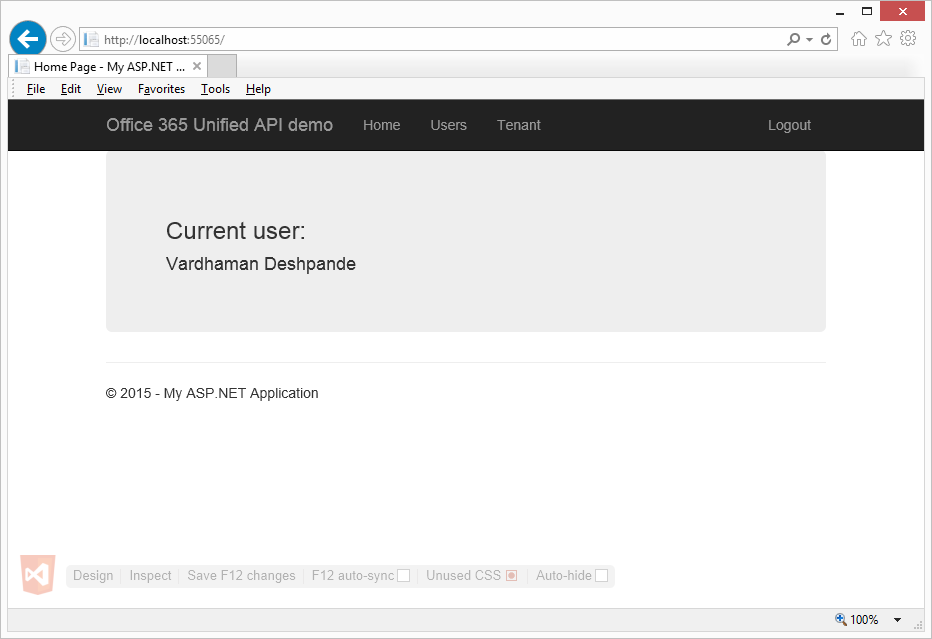
Once you enter the right credentials, the access token will be fetched and passed on to the GraphService client object which will then use it to get the current user from the GraphService.Me property and display it on the console.
Hope you enjoyed reading this as much as I enjoyed fiddling around with this new API :)
I have come across this scenario many times where even if I am the tenant admin in my SharePoint Online tenant, it is not necessary that I will be the site collection admin of every site collection by default. This is by design and makes perfect sense as there might be some site collections where sensitive data might be stored and I might not have rights to see that data despite being the tenant admin. However, in some scenarios you might feel the need to give a user site collection admin rights for all the site collections in the tenant.
Also for OneDrive for Business site collections in the tenant, the user who is owner of the site collection is the only person who has site collection admin rights on it by default. This can be a problem for compliance and e-discovery reasons. You might be in a situation where you need to give site collection admin rights to a compliance manager or a global administrator on all the OneDrive for Business sites in a tenant.
In this post, lets have a look at how you can make a user a site collection admin on all the site collections in a tenant as well as on all the OneDrive for Business site collections in the tenant.
Some notes:
1) For now, this only works with SharePoint Online/Office 365.
2) You will need the SharePoint Online Client Side Object Model Nuget package
3) By changing a parameter in the SetSiteAdmin function, you can also remove a user from the site collection admins of all site collections.
4) The user who runs this code will need Tenant Administrator rights on the Tenant.
1) Add a site collection admin to all site collections in a tenant:
This is the easy part, all you need to do it get the urls of the site collections in the tenant and add the desired user as a site collection admin to it using the Tenant.SetSiteAdmin function.
This file contains bidirectional Unicode text that may be interpreted or compiled differently than what appears below. To review, open the file in an editor that reveals hidden Unicode characters.
Learn more about bidirectional Unicode characters
2) Add a site collection admin to all the OneDrive for Business site collections in a tenant:
This takes a bit more work. Here are all the things we need to do:
1) Get the account names of the users in a tenant using People Search. Now bear in mind that search has a limitation of returning a maximum of 500 rows on SharePoint Online. That will be 500 users in our case. So if your tenant as more than 500 users, you will need to call search in batches of 500 to get the account names of all the users.
2) Once we have the account names of the users, we need to get the url of their OneDrive for Business sites. We can do this by querying the CSOM UserProfile API
3) After getting the OneDrive for Business site urls, all we need to do is use the same Tenant.SetSiteAdmin function as above.
Here is the complete code for that:
This file contains bidirectional Unicode text that may be interpreted or compiled differently than what appears below. To review, open the file in an editor that reveals hidden Unicode characters.
Learn more about bidirectional Unicode characters
There is also another way to do the same thing where you get the OneDrive for Business site urls from the UserProfileService.asmx and then use the Set-SPOUser SharePoint Online PowerShell cmdlet to set the user as the site collection admin. Here are the details for that https://technet.microsoft.com/en-us/library/dn765092.aspx
We all know that in CSOM, for any given object, we can specify certain properties to be brought back from the server. Something like this:
This file contains bidirectional Unicode text that may be interpreted or compiled differently than what appears below. To review, open the file in an editor that reveals hidden Unicode characters.
Learn more about bidirectional Unicode characters
This will only bring back the Title property of the web thus reducing data traveling over the wire.
Now in this case, the second parameter of the clientContext.Load method is an object of type Expression<Func<Web, object>>[]
This is an array of Linq expressions which can be utilized to our benefit. We can convert that array into a parameter which can be passed to a "Utility" function. This function will only get the properties specified in that array. Like this:
This file contains bidirectional Unicode text that may be interpreted or compiled differently than what appears below. To review, open the file in an editor that reveals hidden Unicode characters.
Learn more about bidirectional Unicode characters
Then, that function can be called with different parameters depending on the properties we want to fetch from the server for that particular instance. For example:
Only get the Title and Id of the Web:
This file contains bidirectional Unicode text that may be interpreted or compiled differently than what appears below. To review, open the file in an editor that reveals hidden Unicode characters.
Learn more about bidirectional Unicode characters
Only get the MasterUrl and the CustomMasterUrl of the web:
This file contains bidirectional Unicode text that may be interpreted or compiled differently than what appears below. To review, open the file in an editor that reveals hidden Unicode characters.
Learn more about bidirectional Unicode characters
For both the above calls, we are not changing the GetWebDetails function. It will always return a Web object with the specified properties filled in. It will also reduce data travelling over the wire, as only the specified properties will be fetched. Thus, making your code more flexible and performance friendly.
You can also have other utility functions for Lists, Users etc. Here is a similar function for Lists:
This file contains bidirectional Unicode text that may be interpreted or compiled differently than what appears below. To review, open the file in an editor that reveals hidden Unicode characters.
Learn more about bidirectional Unicode characters
When working with SharePoint Online or developing cloud friendly solutions, it can be tricky to replicate some functionality which is easily available on-premises. We had a scenario recently where the user should be able to set values for a Managed Metadata user profile property. Now if this was a farm solution, we could have used a variety of methods like User Controls, Taxonomy Pickers etc. But since this was a Provider Hosted App, all those options were not available to us.
I knew that the Office Dev Patterns and Practices project has a cloud friendly taxonomy picker but that did not fit our requirements. It requires the creation of an App web in which sense it is not a "pure" provider hosted app. Also, there were some specific requirements around styling and business logic which meant that a custom Taxonomy Picker was the only way forward.
So without much further ado, here is how the custom User Profile property taxonomy picker looks:
1) When loaded first on a page, it gets the values from the "Skills" user profile property and displays them as tags:
2) When you start typing into the input box, the auto-complete suggestions are based on the "Keywords" termset. (You can change this to get terms from another termset)
3) When you are happy with the values, click on update and your Skills user profile property will be updated with the selected values:
And that's basically how it works from an end user perspective.
Advantages:
1) Pure provider hosted app. No App web required. If you are on-prem and in a big enterprise, this means that you don't have to wait for a wild card DNS entry to be setup. We all know how long that can take. This can be implemented as a pure provider hosted app because all calls to SharePoint are made by using CSOM in an MVC controller.
2) Complete control. Can be customized anyway you want. If you have specific business logic which needs to manipulate data before sending it to SharePoint, then you are easily able to do so.
3) Customisable UI: The jQuery Tag-It plugin is used in this taxonomy picker. It supports jQuery ui themes and a whole lot of other styling options. More about this in the Technical details section below.
Limitations:
1) As is, this control only works with SharePoint Online/Office 365. This is because the API for writing user profile properties is not yet available for SharePoint On-Premises. But if you are up for it, you can use the UserProfileService.asmx for accomplishing the same functionality. Check out this sample to see how to do it: https://github.com/OfficeDev/PnP/tree/master/Samples/Core.UserProfilePropertyUpdater
2) At this time, it can only be used with user profile properties. If this has to work with Taxonomy fields in a list, you will have to modify the code but the principles behind the approach would stay the same.
But hey, the source is on GitHub so you don't get to complain! Submit a pull request and I will be happy to merge it :)
Technical Details:
1) Permissions:
Since the app interacts with the Managed Metadata Service and writes to the User Profile Service, the following permissions are needed:
2) jQuery Tag-It plugin:
The completely awesome jQuery Tag-It pluginis used to present the terms as tags in the UI. It provides a wide variety of options for selecting tags. It accepts a JavaScript array of values to show auto-complete suggestions. Check out the plugin home page for more details.
3) Get current user's skills:
When the page loads, we need to get the skills for the current user to show them by default in the control, this can be done by making a simple call to the UserProfile Service.
This file contains bidirectional Unicode text that may be interpreted or compiled differently than what appears below. To review, open the file in an editor that reveals hidden Unicode characters.
Learn more about bidirectional Unicode characters
To show the auto-complete suggestions, the Tag-It plugin requires a JavaScript array of values. We will use a MVC controller to get the keywords from the Managed Metadata Service and pass the values as a JavaScript array to the plugin. You can use any other termset to get your values. It would also be a good idea to cache these values in the browser localStorage so you don't have to make a call to the Managed Metadata service every time the control loads.
This file contains bidirectional Unicode text that may be interpreted or compiled differently than what appears below. To review, open the file in an editor that reveals hidden Unicode characters.
Learn more about bidirectional Unicode characters
This file contains bidirectional Unicode text that may be interpreted or compiled differently than what appears below. To review, open the file in an editor that reveals hidden Unicode characters.
Learn more about bidirectional Unicode characters
In this post, I will show you how to set the current user's profile properties using the JavaScript Client Object Model (JSOM). Please refer to the 2 posts I have mentioned for any additional details around this.
Right now this functionality is only available in SharePoint Online/Office 365. If you want this functionality to come to SharePoint 2013 On-Premises, please create or up-vote on the feedback here: https://officespdev.uservoice.com/
This file contains bidirectional Unicode text that may be interpreted or compiled differently than what appears below. To review, open the file in an editor that reveals hidden Unicode characters.
Learn more about bidirectional Unicode characters


